Last week, we had a special delivery to our classroom. One of our preschooler’s parents had a Poinsettia plant delivered to us! It was an extra special gift that we plan to nurture this month and throughout the New Year! Our preschoolers discussed Poinsettias, looked at the plant through our magnifying glasses, dissected just a small part, and made the special Christmas card crafts below! It was NOT on the lesson plan, but we are great at improvising when we have a new learning opportunity!:) We hope your kids have fun with the crafts below!
Cardboard Tube Painted Poinsettia Craft for Preschool and Kindergarten
Materials needed: Cardboard Tubes, Scissors, Cardstock (or heavy paper for the cards), White Copy Paper (for printing), Red/Green/Yellow Tempera Paint, Paint Smocks (or an old T-shirt to protect clothing), Paint Trays or Paper Plates, Paintbrushes, and Glue Sticks.
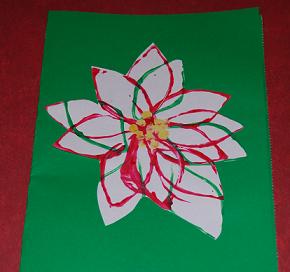
Prior to the card craft: Cut strips of the cardboard tube (horizontally – about 1/2 wide). Open each of the cut pieces (to make a circle) and lay them face up on a table. The children can “pinch” the ends of each strip to resemble a leaf (see cardboard shape near the red paint in the photo below).

To make the Poinsettias: Invite the children to make Poinsettia leaf prints by assembling supplies on a table or in an art area. The children simply dip the cardboard tubes into the paint and print on the white paper. The children can make as many (or few) leaf prints as desired. Allow the prints to thoroughly dry before adding the yellow flower buttons at the center. The children can use yellow markers/crayons or paint tiny yellow dots in the center of the dried leaf prints. Once again, allow the paint to dry thoroughly before cutting out.
The prints make great displays just as they are, but we chose to make our prints into thank you cards to acknowledge our special gift (see photo at the top). We cut around our prints and glued our printed Poinsettias to cardstock. Each of the children then wrote (or stamped) their names on the cards.
3-D Poinsettia Craft for Preschool and Kindergarten
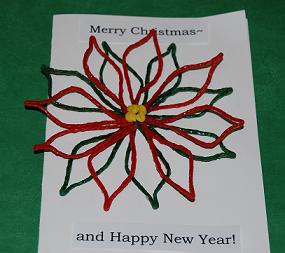
Materials needed: Red/Green/Yellow Wikki Stix, White Cardstock, and Scissors.
Invite the children to craft and create by making a tray with Wikki Stix, scissors, and white paper.
The leaves to the craft are easy to make! The children can fold one strand of Wikki Stix in half to make a loop. If desired, the children can pinch the tip of the loop to make a point (see photo above).
To assemble the Poinsettia: the children can arrange all the crafted green leaves in a circular pattern on their paper. The red leaves are pressed on the top of the green leaves to create a 3-D effect. To make the seeds, the children can cut small pieces of yellow Wikki Stix and press them into the center of the created plant. Wikki Stix can be cut with safety scissors, but younger children may need assistance. The card craft (pictured above) was created by one of our 4 yr. old students!:)
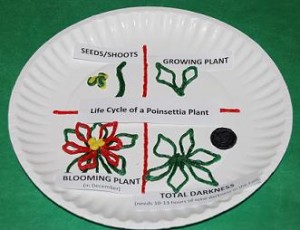
Using Wikki Stix for learning and crafts offers wonderful opportunities to enhance fine motor skills! To see instructions for creating the LIFE CYCLE of a POINSETTIA PLANT below, visit the Wikki Stix Blog!
Please note: the Poinsettia “poisonous myth” is simply not true. A child would have to ingest a lot of leaves to cause illness. Please supervise children closely if looking at/handling real Poinsettia plants. While some children prone to allergies may get a rash from the pollen of the plant (especially those allergic to latex), most plants carry that same risk. If exploring a real plant, be aware of any allergies your children might have and wash hands thoroughly after explorations.
For a great book on Poinsettias, see The Legend of the Poinsettia by Tomie dePaola: