Most kids WANT to use band aids (even for those imaginary “ouchies” that sometimes arise!) While our kids were in a particularly long phase of “band aid love,” we transformed the interest into a “Butterfly’s Life Cycle” (and practiced our fine motor skills with all of the peeling and sticking).
Materials needed per craft: One paper plate, 2 colored band aid strips, 3 circle band aids, 1 fingertip butterfly band aid, 1 small white gauze pad and first aid tape (or the children can roll two regular band-aid strips for the pupa stage), markers or crayons, scissors, glue sticks, and one life cycle printable – Life Cycle of a Butterfly
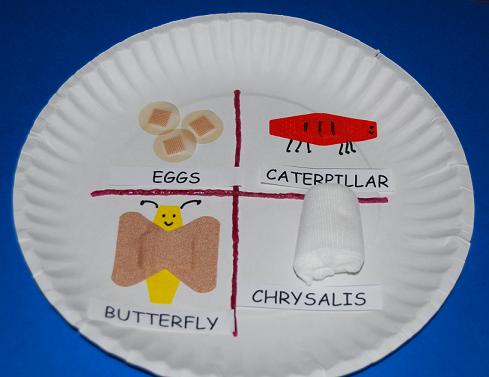
Help the children draw lines to divide their paper plate into 4 sections (or do prior to the activity). Print the Life Cycle of a Butterfly labels (linked above) and have the children cut apart. Explain to the children that there are 4 separate stages to the butterfly’s life cycle.
1. The Eggs – the female butterfly lays eggs and attaches them to leaves.
2. The Caterpillar – the worm-like stage of the butterfly is the caterpillar. The caterpillar eats leaves and grows.
3. The Chrysalis (pupa) – after the caterpillar has grown it forms a chrysalis (or pupa) where changes take place within to transform the caterpillar into a….
4. Butterfly – the butterfly then emerges from the pupa and the life cycle starts all over again.
After discussing the 4 Stages of a Butterfly, have the children place the circle band aids (eggs) at the top (left corner) of the paper plate. The children can then glue the label (EGGS) from the printable under the band aids.
In the right corner (top) have the children use one of the colored band aid strips to resemble the caterpillar. The children can adds legs or antennae with the crayons or markers, if desired. Glue the label (CATERPILLAR) under the band aid strip.
The chrysalis stage can be made using a small gauze pad (rolled and sealed with tape) or by rolling two regular size band aids. Some of the children colored the white gauze rolls green with markers (to more closely resemble the chrysalis). Have the children glue the CHRYSALIS label under the bandages.
We made the final stage of the life cycle with a fingertip BUTTERFLY bandage and one regular strip band aid. Have the children put the regular bandage on the plate vertically (to resemble the butterfly’s body). The butterfly bandage is put across the butterfly’s body to form the wings. The children should glue the strip with the word BUTTERFLY into the last section of the paper plate.
Have the children use markers/crayons to add any additional features they wish to make.
Our kids loved using the band aids to make the butterfly life cycles – we hope YOURS do, too! FOR more insect activities, see the Ladybug and Insect Theme here on the blog!