 THANKSGIVING PILGRIM HATS
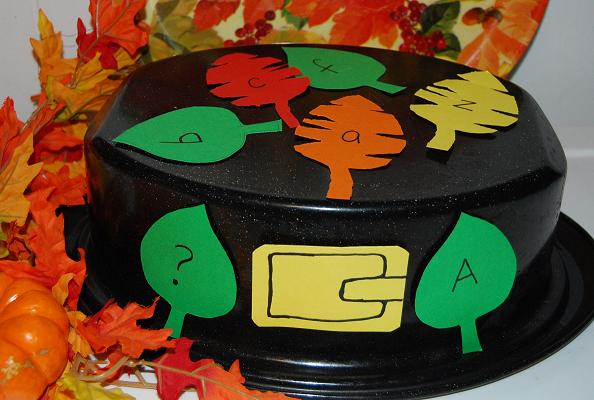
Template – Pilgrim Hats
Materials needed: Print one Pilgrim Hats template (above) for each of your children (print on cardstock, if available, as it is more durable.) Have the children cut out the individual pieces (assist younger children with scissor skills or pre-cut the hat pieces for them.) The children can write their name, if desired, on the yellow buckle (or with white crayon on the black hat bands.) Assist the children in fitting and assembling the hat pieces.
1) Fit two black bands (some children may need three to fit entirely around the child’s head) around the child’s head and staple together (adult only).
2) Add the front black rectangle and staple to the black bands.
3) Staple one last black band to the front (center it) over the rectangle.
4) Have the children glue the yellow buckle to the front of the hat.
5) The children can make a self-portrait or attach a picture that has been printed for them.
THANKSGIVING FEATHERS FOR LITERACY and MATH – Indian Headband Feathers_Math_Letters
Materials needed: Print copies of the file above (as many as necessary for the activity desired), permanent marker, craft magnets, and a magnetic surface (we used the liner to our roasting pan just to add thematic fun to our activity – ANY magnetic surface will work: refrigerator, cookie sheet, magnetic boards, etc.)
The feather templates can be used in many ways. Below please find suggestions for Literacy and Math.
Literacy: 1) Print the Feathers template on heavy paper. The children can cut around the feathers as some of the patterns may be too difficult for little fingers. Older children may wish to cut the complete patterns. The feathers can also be laminated (clear contact paper works, too) for durability. Write an uppercase letter on several feathers and lower case letters on the rest of the feathers. Have the children sort through the lowercase letters to find one that is a match for the uppercase letter displayed (see photo above).
2) Use the feathers for 3 letter words, sight words, word families, or letter/number stamping (if you print the feathers template and put into plastic binder sleeves, the children can use with dry erase markers, if desired.)

Beginning Letter Sounds: Label feathers with a beginning letter sound you are focusing on. Next, draw or glue a clip art image of various objects onto some of the feathers. Each of the pictures should start with and match one of the letters. For example, if you want to focus on the letters A, B, C, and D, put a clipart picture of an Apple, Banana, Cup, and Dog on one of the different feathers. Next, ask the children to sort the feathers with the pictures to their proper beginning letter sound on the magnetic surface.
Number vs. Letter Discrimination: For younger children, label two different feathers: one with “Numbers” and the other with “Letters”. Write a variety of numerals, uppercase letters, and lowercase letters onto the feathers and have your children sort the letters and numbers to the corresponding feather/category. When finished, count and compare the number of feathers under each. Which had the most? Which had the least? To help very young children, “color-code” the feathers: Numbers=Red feathers; Letters=Orange feathers
Math: 1) Print the feathers and write a number on the front of one feather. Have the children count out the corresponding number of feathers to place on the magnetic surface.
2) Have the children sort the feathers by color only. Place one colored feather (the “focus” color) on the magnetic surface. Print several of the feathers and have the children sort through a basket of the feathers placing only the “focus” colored ones on the magnetic board.
3) Print several of the feathers and have the children pattern with them. For younger children, make a pattern with the feathers and see if the child can duplicate the pattern. Older children can create their own patterns with the different feather colors.
4) Use the feathers for basic addition and subtraction. Write the sums of several number problems on the green feathers. Label red and orange feathers with numbers that are equal to the sums chosen. Have the children place a green feather on the magnetic surface and try to find two numbers among the red and orange ones that, when added together, will be equal to the sum on the green feather. (ex: green feather=5, the child must then find 1 red and 1 orange feather with numbers that will be equal to 5; 5+0; 1+4; 2+3). Print several copies of the feathers that the children can use as counters/manipulatives for the activity. To use for basic subtraction, have the children place a green feather and a red/yellow feather on the magnetic surface. The children may use the feathers as counters to determine what numbered feather will solve the problem. (Ex: green feather=5 and a yellow feather=2; the children can count out five feathers and place on the magnetic surface; the child will then remove 2 of the feathers as indicated by the number on the yellow feather. There will be 3 remaining feathers on the magnetic surface. The child must then search for a feather with the number 3 to complete the activity.) For younger children, write the problem on an index card: 5 – 2 = 3; see if the children can count out/take away the numbers of colored feathers to solve the problem. If using the feathers for addition or subtraction, make a + or – sign on an index card and attach a small craft magnet to the back.

INDIAN HEADBANDS – Thanksgiving Theme Indian Headband Craft
Materials Needed: Headband Strips and the Feathers template from the files linked above.
1) Cut out the strips and fit around the child’s head. Staple the strips together (adult only).
2) Have the children write/stamp their name on one of the feathers and glue to the front of the headband. The children can also write or stamp the individual letters to their name on the feathers before adding to the headband.
3) Have the children choose which feathers they wish to add to their headband. The children can glue the feathers to the band (an adult can also staple the feathers for them.)
Enjoy the Harvest Season Creating Special Learning Memories with your Children! Need additional resources for Thanksgiving? Our Thanksgiving Theme provides tons of great activities or see Preschool and Kindergarten Themes for Active Learning and Play!